Good evening readers! So I know I haven't posted anything in six months... turns out I'm horrible with New Years resolutions. I just have not had time with all the craziness around here.
I won't sit here and tell you that from now on I will do better, but I WILL give you a sneak peak of our progress and a breakdown of our laminate floors!!
So I wake up this morning to a text from my lovely SIL. I have the best sister in law. EVER. (Be jealous). She is a very special part of our lives and I think of her as if she were my blood. Growing up I always wondered what it would be like if my brother and I had a sister and she is exactly the type of sister I imagined I would want. She helps me shop, teaches me to cook (she is an EXCELLENT cook!), cheers me up when I'm feeling down, shares my secrets, supports me, loves all things Disney with me, drinks with me and even fights with me on occasion. Ok, Ok, a bit cheesy... maybe. But its the truth! She is all those things plus tons more I won't subject you to!
Anyway, the point of telling you all that is because she and her husband have just put in an offer on their first house! (eeek!!) We are SO excited for them! We know how awesome it feels to finally own your own home and we have been impatiently waiting to share that experience with them.
So the text she sent me this morning was to ask about our experience putting in laminate flooring and all the details that go along with it. I figured instead of writing her a ten page text, I would just post it here so that everyone else can benefit from her questions! (And man were there a lot of questions!)
The Questions:
The Answers:
I'm going to skip around a bit, but I will cover all of the questions. I want to start with where we got our laminate. This was a VERY hard part. Even harder than installation. We originally went to several different local flooring specialists. We figured the flooring guys would have the best deals on flooring. Understandable assumption, right? Wrong. Our criteria for choosing a laminate flooring were:
-It had to be dark. This is the only way hubby would go along with it.
-No red tones. I am NOT a fan of red wood in any form. Sorry to all you cherrywood lovers.
-It needed texture to it. I hate that slick stuff that doesn't even kind of look like real wood.
-At the advice of a helpful man at floor trader where we bought the bedroom carpet, we looked for laminate with the Easy-Clic locking system. He said it was the easiest to install.
-It had to be reasonably inexpensive. We told ourselves we would go up to 2.00 per sqft if it was the best laminate we've ever seen.
So the first three places we went only had one dark laminate and it cost at least 3.00 per sq ft. Ouch. After realizing that local places were not cheap by any means and looking at every flooring place in this city, I started to think that maybe our price range was unrealistic.
Then I did what most anyone would do, I went online. I found one site in particular that I loved and decided we were going to use, Build Direct. We found so many options that we liked at an affordable price AND I could read reviews (I am a review freak)! The down side, we were running out of time. We only had about a three week window from the time we closed until the time we had to be out of our apartment and we couldn't start moving in without floors (duh). We still had to buy the floors, install the floors and move everything in. Thankfully we still had to paint so that bought us some time, but the clock was a tickin.
The good thing about local floor companies is you can buy one plank, bring it home and see it in your house. This is important because the lighting can change EVERYTHING. There was one that we kinda liked that was 2.00 a sqft from Floor Trader that once we got home looked red and gross. With Build Direct you can order free samples, but with our time crunch and the delivery time on the sample and then on the order if we decided to go for it, we would run out of time.
So our options were to just buy the one we THINK will look good without a sample, or spend an arm and a leg at a local place on something I didn't love.
I was so frustrated.
I was two screens away from buying floor I hadn't seen when it hit me. I can't believe I had been so stupid. I hadn't even CHECKED Lowes or Home Depot. I though about them when we very first started looking, but I immediately shrugged them off because I assumed it would be to expensive. But at my new thought, I jumped in the car and headed to Home Depot. No luck, great. Trying to stay hopeful, I headed off to Lowes. Wouldn't you know it, tucked away on the back row was a handful of good quality, affordable laminate choices! And smack dab in the middle of those choices was a non red, dark textured option for only 1.25 per square foot!!! Thank you Jesus!! I was all,
To top it all off, Lowes gives a 10% military discount. So that meant the floors were that much more affordable. The style was called Curly Walnut by Style Selections and you can find it here. As I write this post it is selling for only .99 per sqft. That is a steal.
THE MATERIALS:
After doing some VERY rough math (I hate math), I loosely calculated that we needed 800 sq ft of flooring. In addition to this, you should ALWAYS order 10% more to account for any future repairs that may need to be made. It would suck for you to need two panels, but the store has discontinued your flooring. ALWAYS order the extra 10%. Or more if you can afford it. So we bought enough to cover 900 sq ft. Each box covered 21.44 sq ft so we bought 42 boxes to cover a total of 900.48 sq ft. You still with me?
Now to the more technical stuff. Anyone looking to install their own laminate flooring needs to also consider the materials you will need. They are:
-Laminate Underlay: This is the cushion between the laminate and the foundation. We went with the brand Lowes had in stock (found here) because 1.) we were already there 2.) we got the military discount on it also and 3.) it was the kind with plastic on one side (get this kind! It's supposed to be better in case of accidental spills that seap through the laminate).
COST: $44.99 per roll (each roll covers 100 sq ft).
-Transitions: This is the molding that will cover, well, the transition between your laminate and another material. This is most common in doorways (into a carpeted bedroom or tiled bathroom), but we also had a transition into our kitchen. You will buy these to match your laminate. We put transitions at each external door, but later learned that a professional installer just runs the laminate all the way up to the door frame. Oh well, no one has noticed yet and I'm not pulling up our floors just to fix it. There are four different types of transitions to cover different materials. I don't know the ins and outs of transitions, so for specifics you'll need to consult everyone's good friend google. We chose to just buy this nifty type of transition called a 4 in 1. And it's just how it sounds, all four types into one molding. You can find the one we purchased here. Again, this should match the color and pattern of your flooring.
COST: $26.97 per 78 inch piece.
-Quarter Round: This is moulding that goes around the edge of the flooring at the very end. Quarter round is a very sore subject in the laminate and hardwood flooring world. When installing laminate flooring you must always leave a 3/8 inch gap called the "expansion gap" between the edge of the flooring and the wall. This allows the flooring to expand and contract freely. If you do not leave this gap, the floor will expand and then you will have buckling. A lot of professionals believe that the only right way to install the flooring is to pull up your base boards, install your laminate and then re-install the baseboards. This does a few good things. It covers the gap, allows you the option of upgrading your baseboards later if you choose without pulling up your floors, and it looks nice. We ran into a few problems there. The first being that we already had a very long list of things to do in a short amount of time and pulling up baseboards was not a huge priority. Second, hubby did NOT want to pull them up. Third, we had already painted the baseboards. And fourth but most importantly, when I tried to pull one baseboard off (trying to convince the hubs it wouldn't be too hard), I pretty much broke a piece of wood off and changed my own mind. I did not have the time or money to replace pieces of baseboard that might break when pulled up. We opted for the common but frowned upon option of just installing the floors, baseboards still intact, and then covering the gap with white quarter round. Some people say it can cheapen the look of the floor, but I think it makes it look more finished, at least at our house. With all of that said, if you choose to use quarter round, there are many different sizes to choose from. We used the 11/16 sized molding found here. Again from Lowes, because we were there and because of the discount.
COST: $4.97 per 11/16 inch by 8ft piece.
-Pull Bar, Tapping Block and Spacers: When we first started we thought we wouldn't need these things, but trust me you do. Thankfully some friends of ours had JUST finished installing their own floors and already had these things for us to borrow. The spacers go between the flooring and the wall to make sure you have a proper sized expansion gap. The boards move as you install them, so without these you will end up with no space and eventual buckling. The tapping block is to tap each piece together so that they are as tight as possible. The pull bar is for tapping the pieces along the wall where a tapping block can't do the job. Lowes (and I'm sure many other hardware stores) sells a kit with all of these things included found here. They also sell each thing separate if you already have some items.
COST: Free to us, but the all in one kit at Lowes is $18.56.
-Seam Tape: This is used to tape together the strips of protective underlay. The underlay we bought came with built in seam tape on the edges, but the individual tape came in handy for those pieces that we had to cut to fit in, like against the wall edge. The one we bought was from Lowes and can be found here.
COST: $5.69 for 30 yards.
-Rubber Mallet: This is used for tapping the block or pull bar. You dont want to use a regular hammer because it concentrates too much pressure in one spot and can chip the laminate. Speaking from experience here.
COST: We borrowed one from my dad, but retail at the hardware store it goes for about 15 bucks.
-Liquid Nails and a Drill: This is for installing the transitions. The directions call for drilling into the concrete, but we also used the adhesive just to make sure it wasn't going anywhere.
COST: We already had the drill, the Liquid Nails was $2.52 per tube.
-Mitering Saw: You could technically use a table saw for the flooring and transitions, but the mitering saw made it much easier and was necessary to cut the quarter round at the angle needed. PSA: Always practice safety when operating equipment such as this.
COST: We borrowed one (and later received one as a gift from the In Laws!!) but retail they are super pricey. Anywhere from $200 - $1,000 depending on the quality and brand. You may also be able to rent one from your local hardware store if you can't borrow one or commit to purchasing one.
-Nail Gun / Hammer and Nails: We borrowed a nail gun to install the quarter round, which I highly recommend because it makes the already daunting task a little bit easier. But if you don't have one or can't borrow one a hammer, nails and a little hard work will get the job done.
COST: Free to us, but hardware stores sell compressor/nail gun kits like this one for as low as $180.
-White Paint: For the quarter round and baseboards. They come primed, which I was totally ready to just leave that way (hey, its white!), but it looked dirty and dingy so we ended up painting them. Some people recommend painting the molding first so you don't have to worry about getting paint on your newly installed floors. We did that but ended up having to repaint them anyway after we nailed them on and filled in the holes. Definitely paint the baseboards first though.
COST: We bought the primer/paint combo for $26.07. Any durable white paint will do.
-Wood Filler: To fill in the nail holes of the quarter round after installing. You can find this at any hardware store.
COST: $5.95 per tube.
-White Caulking: This is for filling in between your quarter round and base boards once finished.
COST: $4.95 per tube.
Other cheap miscellaneous materials you may need:
-Scissors / Utility Knife: For cutting the underlay to size or scrapping old underlay off.
-Measuring tape: For, you know, measuring.
-Safety glasses (or sunglasses if your my husband): For when your cutting the wood. Safety first folks.
-Sharpie: For marking measurements.
-Crowbar or Screwdriver: To pull up the tack strips if you're pulling up carpet.
-Camera: To document your hard work!
-Patience: trust me, those corners will make you need it.
And lastly but most important, good friends. Because nothing makes a hard job easier, faster and more fun than having awesome people to help and share in the experience. :)
So lets total everything up and give you guys the numbers we used.
Flooring: 42 boxes at $26.82 per box (1.25 per sq ft) TOTAL = $1126.44
Additional 10 boxes (read about this at the end of this post) at $26.82 per box TOTAL = $268.20
Underlay: 9 rolls at $44.99 per roll TOTAL = $404.91
Transitions: 7 strips at $26.97 per strip TOTAL = $188.79
Quarter Round: 23 pieces at $4.97 per piece TOTAL = $114.31
Misc. tools / materials: TOTAL = 50.13
GRAND TOTAL = $2152.78 plus 7% tax = $2303.48 - 10% military discount =
FINAL total of $2073.13!
If it had not been for friends / family to help out with either their time or tools, this could have cost SO much more! So thank you to all of you that contributed in one way or another!!
I think that pretty much covers all costs, but if I've missed something just let me know!
THE INSTALLATION:
So you have the materials list, now lets get into the actual installation!
First step was to rip up that nasty carpet and carpet padding. We did a little painting first but got tired of the smell. So we pulled it up and painted the rest of the house and baseboards with the concrete exposed. That way we didn't have to use drop cloths. Just use your utility knife and it will cut like buttah. Way easier than we thought. Except for the smell. That smell still haunts me in my dreams.

 |
The lovely Amanda pulling up the pad. You can see the pieces of pad
that were stuck to the concrete. This stuff was a beast to get up. |
 |
This is our awesome friend Crystal going to town on the tack strips.
It was a great way to get out some anger! :) |
 |
| So much nasty in this picture. |
 |
| Sweeping up the mountains of sand that came out of the carpet and pad. |
As previously mentioned, the second step was to paint those baseboards while nothing was in the way! We washed them first with a magic eraser (these things are amazing) because they were stained and frankly I didn't trust the cleanliness of the previous owners. We then used our razor blades to scrap off all the carpet pad that was glued to the concrete. It was originally glued on with liquid nails, and when the pad was pulled up it basically disintegrated from all the urine so there was A LOT of this stuff to scrape up. Have I mentioned how awesome our friends are? After scraping it all up, we swept all the floors. If you have even the smallest rock on the floor, you will feel it under the laminate. So clean it well.
Next it was time to lay out the underlay and install the flooring. Now I'm not going to get all technical, if you need a step by step guide, I would (and I did!) check out some serious youtube tutorials. This is just one pretty good video I would recommend. This post just meant to be a brief (ok not so brief) overview.
Let me preface this by saying that before getting started, you have to let your laminate acclimate to the temperature and humidity of your house. This may sounds dumb, but it needs to expand / contract to the conditions in your house. That way you are able to leave the appropriate expansion gap. So plan for at least 48 hours of not touching that flooring once you bring it home.
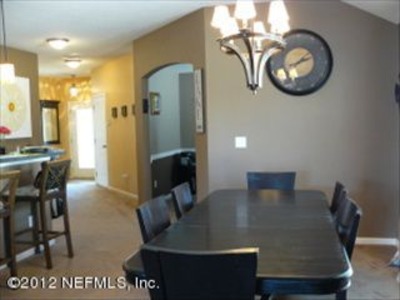
After it had acclimated, we started by figuring out which way to lay the laminate. We were told by the professionals that the flooring should be laid perpendicular to the joists (the beams running from wall to wall supporting the roof). We were also told it should run long ways to the light source. I don't know if that makes sense, but if you look at the glass door in the above picture you notice the light shines all the way down the long wall. So the flooring should run parallel to this. We had a pretty long discussion about how to handle our entry way since the hallway runs a different direction. We discussed changing the direction of the wood, but I thought it would look weird and unprofessional so we opted against it. It ended up being more work, but it looks way better this way.
So my advice is don't take shortcuts! It might be easier now, but will it look the best in the long run?
We started in the far left corner of the room as seen below:
We laid the appropriate amount of underlay for that row, and then ran the flooring all the way down the wall. I'm not sure if you can tell by this picture, but the laminate first clicks in on the long side and then seals on the short end. We alternated panels from different boxes just to make sure the colors and patterns were all mixed and flowed well. Also, you will get more specific details in an instructional video, but you should alternate the "seam" on the short end to make sure the planks don't all join together at the same point. The video I linked in the above paragraph shows this well.
This section was easy. No corners, no doorways. Until we got to this point. And it had been such a long day that the boys couldn't do math, so we called it quits for the night.
Quick note.. you can kind of see the spacers along the back wall, and the shiny strip of adhesive on the underlay for attaching to the next strip.
This is how it looked after the first day:
Not to shabby, but still a long way to go. And a lot more corners and doorways to deal with. We got started the next morning and knocked out the living room:
 |
| This would not have been possible without these people right here. They were so extremely helpful and good spirited!! |
 |
At this point, the hubs had a system. So focused! :)
|
 |
Meet Josh. He is the corner master. He pretty much used his Jedi tricks on all of
the corners around our office and for the transition into the hallway. |
I now bring you lots of pictures of men cutting wood! :D
Next it was time to start on that wretched hallway. Btw, you'll notice in the picture below that we took the cardboard part of the box the panels came in and used it as a template to measure the length we needed, then we would draw it in sharpie on the laminate for cutting. It worked out perfectly since the cardboard piece was the exact width of the laminate plank.
Our diligent workers had to go home, so from this point on, it was Jon and I riding solo. Nbd. It didn't start off too bad, but by the end of the night we were just so tired and hungry and done with making measurements that we worked in silence just trying to finish. We got all the way to that doorway behind J which leads into the hallway between guest rooms and the last section we had to finish.
And thats when it happened. We ran out of flooring.
We had ordered 10% more to account for future replacements and still, we had run out. I think this is due to a combination of bad math and messing up on too many pieces when we were first getting started. To make matters worse, the laminate is special order which means it isn't kept in stores and has to be ordered.
And even worse, we had to move in like 3 days later. SO close. Yet sooooo far away.
Still, we laid down and enjoyed what large percentage we had finished.
To add insult to injury, at the exact moment that Jon laid down, the keys in his pocket left a huge scratch on the floor. It had been such a long day that we just laughed it off. It was a pretty big scratch, but once we could move the furniture in you wouldn't even be able to tell.
After this day, it sat unfinished for a week and a half until we got the next 10 boxes in that we ordered. I don't have pictures of this part, but we finally finished them and then started working on the transitions (which we had to buy an extra strip of). I don't have pictures of that either. :/ BUT the transition kits come with pretty detailed instructions, so you should be fine.
Essentially you nail/glue the metal piece down and then attach the appropriate molding type. Easy as pie. The only thing that wasn't easy as pie and that I would change in a heartbeat if we ever do this again is the way we handled the doorways.

The bottom of the molding should be cut away to allow the laminate to go underneath. We did not do this. We just left the expansion gap and cut the laminate around the molding. This left us with a huge gap that would look stupid covered with quarter round. Our only option which actually worked pretty well was to use brown caulking to fill in the gap. It matches the flooring color pretty well, but it took DAYS to do and was super messy.
If you're reading this and you haven't started yet, CUT YOUR DOOR FRAME BOTTOMS!
Trust me on this one.
The last and final step (which if I'm honest, didn't happen until after living in the house for at least two months) is to install your quarter round. As I mentioned before, we painted it first.
Then it was time to cut and install. This sounds super easy, but it's not. It's not rocket science or anything and I kind of enjoyed it, but figuring out those corner angles can be rough at times. And it can take forever! I feel like we spent longer installing quarter round than we did with the flooring! We took our time, but eventually got it all installed. The new air compressor / nail gun kit from my dad was perfect for this job! Thanks dad!!
A few quick tips for quarter round:
1.) Don't get to crazy with the pre-installation painting. I was kind of a Nazi about it and we ended up having to completely repaint them anyway due to the wood filler. (Sorry Hubby)
2.) Nail the quarter round at an angle and into the baseboard. if you nail straight down, you will nail into the laminate and will prevent the piece from being able to expand.
3.) Once installed, fill all holes and corner gaps with a good paintable wood filler, let dry and then sand. Once all dry and sanded, paint that baby! Lastly, use a white caulking around the edge between the quarter round and the baseboards and then step back and enjoy your finished work!
This is what our place looked like right after moving in with the floors completely installed minus quarter round and kitchen transition:
The below picture was a few months later after installing quarter round and buying a few new pieces of furniture. If you look closely against the bottom right, you'll see the finished quarter round.
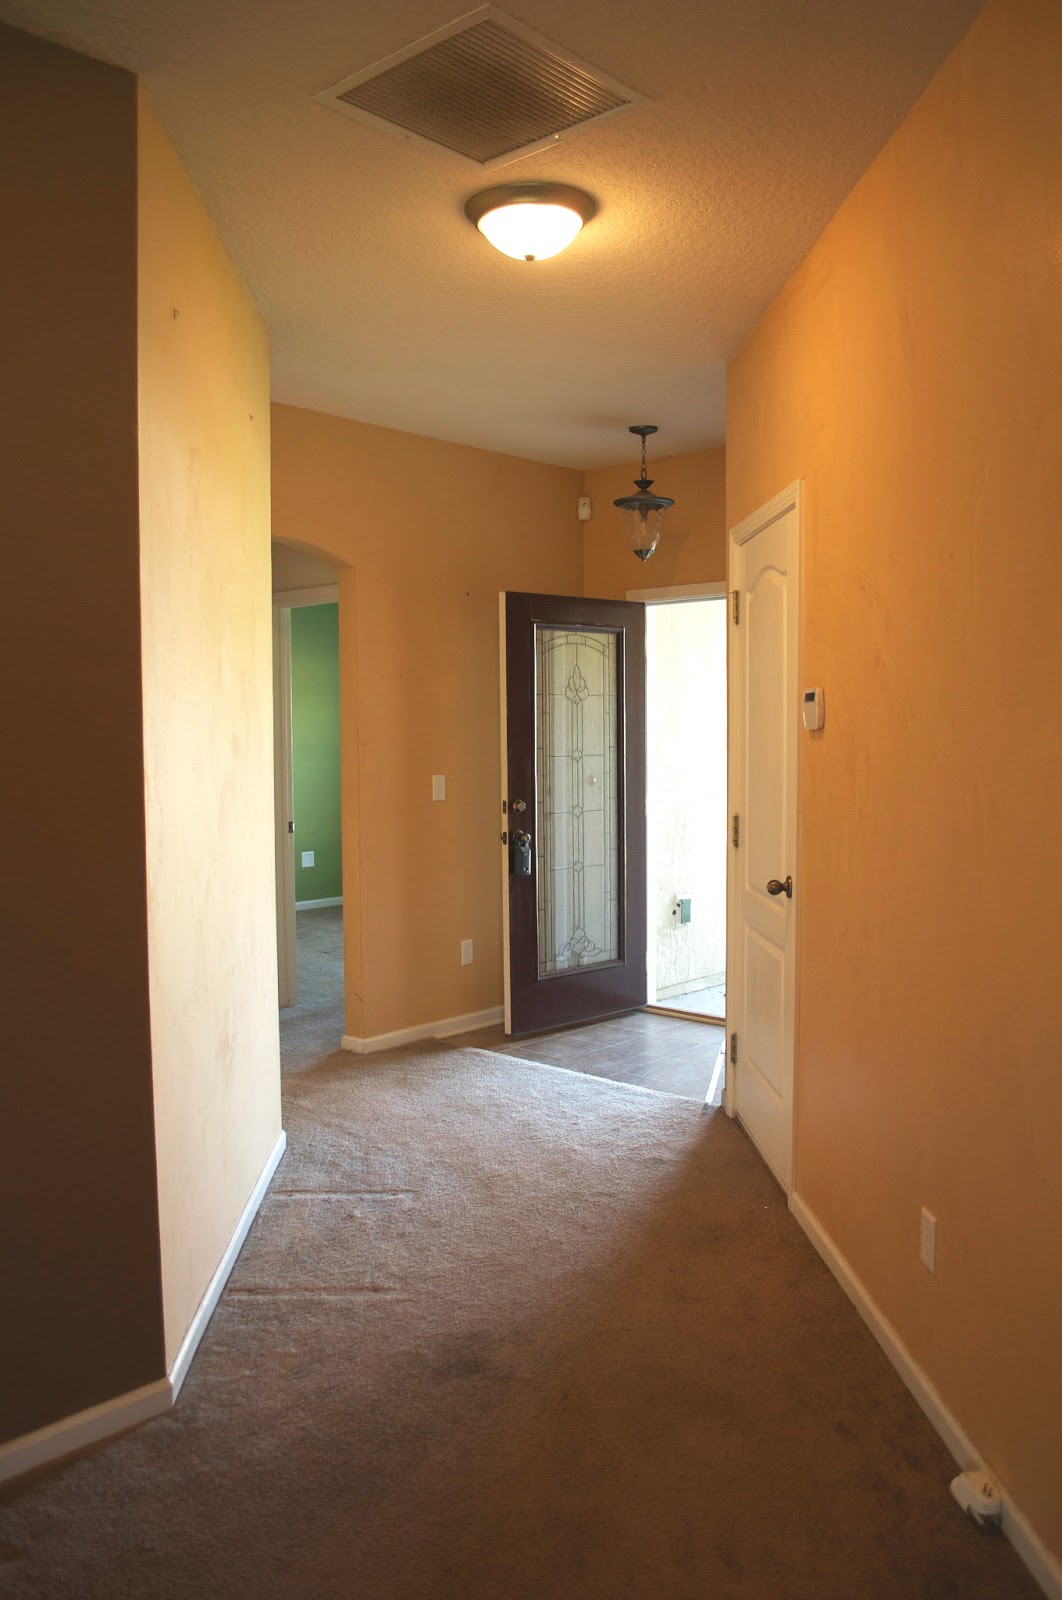
A quick before to remind you where we started:
Overall, the floor installation could have taken 4 days of non-stop work had we not run out of flooring. But that can vary for others depending on the sqft you're covering, how many angles you have, how many people are helping, what tools you're using, ect.
So looking back at the questions, I think I pretty much covered all the bases. It only took writing a book to do!
If there is anything I missed or anything you have a question about, just ask!
Thanks for reading! Until next time!


